Olgas Snackers Recipe | Crispy & Savory Treat
Craving that nostalgic flavor of Olga’s Kitchen? My homemade Olga’s Snackers Recipe is the perfect way to bring that crispy, cheesy, and savory bread snack right into your kitchen. These golden bites are made with fresh, soft Olga bread, baked until crunchy, and coated in a delicious signature seasoning mix. Dip them in your favorite sauces, or enjoy them just as they are for the ultimate comfort snack.
Craving that nostalgic flavor of Olga’s Kitchen? My homemade Olga’s Snackers Recipe is the perfect way to bring that crispy, cheesy, and savory bread snack right into your kitchen. These golden bites are made with fresh, soft Olga bread, baked until crunchy, and coated in a delicious signature seasoning mix. Dip them in your favorite sauces, or enjoy them just as they are for the ultimate comfort snack.
Dough Preparation
Making Olga bread is the heart of this recipe; it’s soft, pillowy, and slightly sweet, which makes the base for those addictively crunchy snackers. Follow my steps carefully to get the perfect texture.
Mixing the Ingredients
- Activate the Yeast: In a small bowl, combine the warm water, yeast, and sugar. Let it sit for 5–10 minutes until it becomes foamy and bubbly. This step ensures your bread will rise beautifully.
- Heat the Milk: Warm the milk in a saucepan until just lukewarm (not boiling). This helps the yeast and dough bind together smoothly.
- Combine Wet Ingredients: In a large bowl (or stand mixer), whisk together the egg, honey, olive oil, margarine, and salt. Slowly add the warm milk.
- Add Dry Ingredients: Gradually stir in the flour, about 1 cup at a time, mixing well after each addition. Add the yeast mixture and continue mixing until a soft dough forms.
Kneading and Letting the Dough Rise
- Kneading: Knead the dough on a lightly floured surface for about 8–10 minutes until smooth and elastic. If using a stand mixer, use the dough hook for 5 minutes on medium speed.
- First Rise: Place the dough into a greased bowl, cover with a clean kitchen towel, and let it rise in a warm spot for about 1 hour, or until it has doubled in size.
- Shaping the Bread: Once risen, punch down the dough gently and divide it into 9 equal pieces. Roll each piece into a ball, then flatten it into a round shape with a rolling pin.
- Cooking the Bread: Heat a skillet or flat pan over medium heat and cook each round for about 1–2 minutes per side, until lightly golden and puffed. This step creates the iconic Olga bread base.
Making Olga’s Snackers Seasoning
The magic of Olga’s Snackers lies in the bold, cheesy, and savory seasoning. It’s what transforms soft bread into irresistible bites.
Mixing the Seasoning
In a medium bowl, combine:
- Romano cheese
- Celery seeds
- Garlic powder
- Sesame seeds
- Black pepper
- Paprika
- Poppy seeds
- Cayenne pepper
- Salt
Whisk everything together until evenly blended. The Romano cheese adds a salty, nutty punch, while the mix of sesame and poppy seeds gives that signature crunch.
Baking the Olga’s Snackers
Once your bread is ready, it’s time to transform it into snackable bites.
Step-by-Step Baking Process
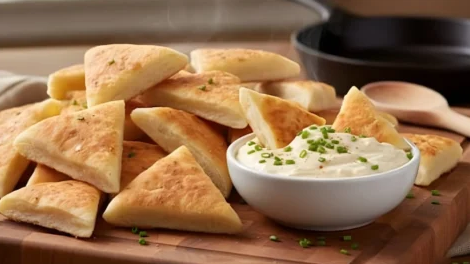
- Slice the Bread: Cut each Olga bread round into strips or triangle-shaped pieces, similar to pita chips.
- Prepare the Baking Tray: Place the sliced bread on a baking sheet. Lightly spray with olive oil (or brush gently for an even coat).
- Season Generously: Sprinkle the seasoning mix evenly over the bread slices. Be generous here—the seasoning is what makes them addictive!
- Bake to Crispy Perfection: Bake in a preheated oven at 350°F (175°C) for about 8–10 minutes.
- Flip and Re-Season: Flip the bread pieces halfway through baking, lightly spray with oil again, and sprinkle with a bit more seasoning. Continue baking until golden brown and crisp.
- Cool and Serve: Remove from the oven and let the snackers cool slightly on a wire rack. This helps them stay crunchy.
Serving and Decoration
One of the best parts about making Olga’s Snackers at home is how versatile they are. You can serve them in so many fun ways:
- Classic Dip Combo: Pair with ranch, hummus, spinach-artichoke dip, or Olga’s famous cheese sauce.
- Sweet Twist: Lightly drizzle with honey or cinnamon sugar for a unique sweet-and-savory treat.
- Party Platter: Serve them alongside fresh veggies, cheeses, and charcuterie for a crowd-pleasing appetizer.
- On-the-Go Snack: Store in small bags or containers for a quick bite during the day.
Storage Instructions
Keeping Snackers Fresh
Store your Olga’s Snackers in an airtight container at room temperature for up to 3 days. Make sure they’re completely cooled before storing to prevent sogginess.
Freezing for Later
If you want to enjoy them longer, freeze the baked snackers in a freezer-safe bag for up to 1 month. To re-crisp, pop them into the oven at 325°F for about 5 minutes.
Olgas Snackers Recipe
Ingredients
Video
Notes
Required Kitchen Tools
When preparing Olga’s Snackers at home, having the right tools makes everything easier:- Mixing Bowls – For combining bread dough and seasoning.
- Stand Mixer or Hand Mixer – Helps knead the dough with less effort.
- Rolling Pin – To flatten the dough evenly before cooking.
- Baking Sheet – For baking the sliced Olga bread into crispy snackers.
- Cooking Spray or Brush – To lightly oil the bread before seasoning.
- Spatula or Tongs – To flip the bread evenly while baking.
Frequently Asked Questions (FAQ)
Can I use a different cheese instead of Romano?
Yes! While Romano gives that salty, nutty punch, you can substitute it with Parmesan or Asiago. Each cheese will provide a slightly different but still delicious flavor.
Can I make Olga’s Snackers gluten-free?
Absolutely. Swap the all-purpose flour with a high-quality gluten-free baking flour blend. Just keep in mind that the texture of the bread may be slightly different.
Do I have to bake the bread before turning it into Snackers?
Yes. The bread should first be cooked in a skillet to create the classic Olga’s bread texture. Then, you slice and bake it into crispy snackers.
What dips go best with Olga’s Snackers?
Ranch dressing, cheese sauce, marinara, hummus, and spinach-artichoke dip are popular choices. For a sweet twist, try a cinnamon sugar version with cream cheese dip.
Can I make the dough ahead of time?
Yes! Prepare the dough and let it rise once. Store it in the fridge (covered) for up to 24 hours before rolling and cooking.
How long do Olga’s Snackers stay fresh?
They’ll stay fresh in an airtight container for up to 3 days at room temperature. For more extended storage, freeze and reheat as needed.
Can I air-fry the Snackers instead of baking them?
Yes! Air fry at 350°F for about 6–8 minutes, flipping halfway through. They turn out extra crispy with less oil.
Conclusion
Making Olga’s Snackers at home is not only fun but also incredibly rewarding. From the soft homemade bread to the flavorful seasoning, every bite captures that nostalgic Olga’s Kitchen taste. Whether you’re snacking solo, entertaining guests, or looking for a copycat recipe to satisfy your cravings, these snackers are a guaranteed hit.
I love serving them warm with dips, but honestly, they disappear fast, no matter how I present them. So grab your ingredients, roll up your sleeves, and enjoy the crispy, cheesy, and oh-so-addictive Olga’s Snackers Recipe right from your own kitchen!

Sally Mckenney is a dedicated baking enthusiast and dessert lover who creates and shares delicious cake recipes and practical baking tips on Daily Bake Lab. Her passion for sweet treats inspires home bakers to explore new flavors and enjoy the art of baking.