Bens Cookies Recipe | Crispy & Chewy Homemade Treat
If you’ve ever strolled past a Bens Cookies shop, you’ll know that unforgettable aroma of freshly baked, oversized cookies. Soft in the center, chewy around the edges, and loaded with rich chocolate chunks and ginger, these cookies are a treat you’ll want to bake again and again. The best part? You can easily recreate this famous Bens Cookies recipe right in your own kitchen with simple ingredients and a few easy steps.
Whether you’re craving that authentic bakery-style cookie or want to surprise your family with a batch of homemade goodness, this recipe is your golden ticket. Let’s dive in!
Dough Preparation
Getting the dough right is the secret to achieving that soft, chewy Bens Cookies texture. Follow these simple steps:
Step 1: Mix the Dry Ingredients
In a large mixing bowl, whisk together self-raising flour, plain flour, and salt. Add in the chopped stem ginger and give it a quick stir so the ginger pieces are coated in flour (this prevents sinking while baking).
Step 2: Prepare the Wet Mixture
Melt the butter in a microwave-safe bowl or gently on the hob until smooth. Let it cool slightly to avoid scrambling the eggs.
In another bowl, whisk together the melted butter, dark brown sugar, caster sugar, and vanilla extract until well combined.
Step 3: Combine Wet and Dry
Beat the eggs into the cooled butter-sugar mixture one at a time. Slowly fold this mixture into the flour and ginger bowl until you get a thick, sticky dough.
At this stage, your dough should be soft but firm enough to roll into balls. If it feels too sticky, chill it in the fridge for about 10 minutes before shaping.
Shaping the Cookies
One of the secrets behind the irresistible charm of Bens Cookies is their rustic, chunky look. Unlike perfectly uniform cookies, these are all about that homemade feel.
- Divide the Dough – Split the dough into 12 equal portions. Each portion should be about the size of a golf ball.
- Add Chocolate Chunks – Press a few pieces of dark chocolate into each dough ball. This way, you get gooey chocolate pockets in every bite.
- Shape and Flatten – Roll each portion into a ball, then gently flatten it with your palm. Don’t worry if they look a little rough, Bens Cookies are meant to look rustic!
- Extra Chocolate on Top – For that bakery-style look, press a couple of extra chocolate chunks onto the top of each cookie before baking.
Baking Instructions
Now for the best part, baking these beauties to golden perfection.
- Preheat the oven to 180°C (350°F).
- Lightly grease 2 baking trays or line them with parchment paper.
- Place the shaped cookies onto the trays, leaving enough space between them (they’ll spread slightly).
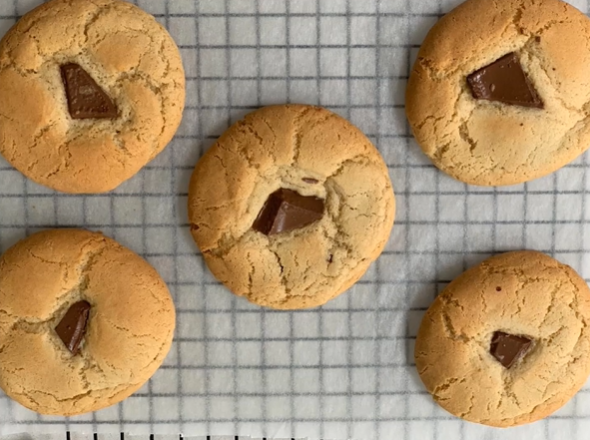
- Bake for 6–7 minutes. The edges should look set, but the centers will still be soft and gooey. Remember, Bens Cookies are famous for their chewy texture, so don’t overbake!
- Remove from the oven and let them cool on the trays for a few minutes before transferring to a cooling rack.
Pro Tip: The cookies might look underdone when you first take them out, but that’s precisely what gives them that soft, chewy bite. They firm up as they cool.
Serving Suggestions
Freshly baked Bens Cookies are best enjoyed warm, when the chocolate is still melty, and the centers are irresistibly gooey. Here are some delicious ways to serve them:
- Classic Style – Enjoy them as they are with a glass of cold milk.
- With an Ice Cream Sandwich, a scoop of vanilla or salted caramel ice cream between two cookies is the ultimate dessert.
- Coffee Companion – Pair your cookie with a hot cappuccino or latte for that authentic café vibe.
- Gift Idea – Wrap them in parchment and tie with a string; these cookies make the sweetest homemade gift.
Storage Instructions
Short-Term Storage
Keep the cookies in an airtight container at room temperature for up to 3 days. They’ll stay soft and chewy if stored properly.
Freezing the Dough
If you’d like to bake fresh cookies anytime, you can freeze the unbaked cookie dough balls. Just pop them onto a tray, freeze until solid, then store in a freezer-safe bag for up to 2 months. Bake directly from frozen, adding 1–2 extra minutes to the baking time.
Freezing Baked Cookies
You can also freeze fully baked cookies. Once cooled, store them in a freezer-safe container with parchment between layers. Reheat in the oven for 2–3 minutes at 160°C (320°F) for that just-baked taste.
Bens Cookies Recipe
Ingredients
Video
Notes
Required Kitchen Tools
When it comes to baking Bens Cookies at home, having the right tools can make your baking session smooth and stress-free. Here’s what I use every time I bake a batch:- Large Mixing Bowl – Perfect for combining dry and wet ingredients.
- Electric Hand Mixer or Stand Mixer – Saves time and gives a smooth, lump-free dough.
- Measuring Cups & Digital Kitchen Scale – Accuracy is key for consistent cookie texture.
- Baking Trays – Line them with parchment paper or lightly grease for easy cookie removal.
- Cooling Rack – Essential for keeping cookies from going soggy after baking.
- Wooden Spoon or Silicone Spatula – For mixing in those chocolate chunks and ginger pieces.
- With these tools ready, you’ll feel like a pro baker in no time!
Frequently Asked Questions (FAQ) About Ben’s Cookies Recipe
Why are Ben’s Cookies so famous?
Bens Cookies are loved worldwide for their giant size, soft centers, and gooey chocolate chunks. Unlike regular cookies, they’re slightly underbaked to keep that melt-in-your-mouth texture.
Can I make Ben’s Ben’s Cookies without ginger?
Yes! While the stem ginger adds a warm, spicy-sweet kick, you can skip it if you prefer. Just replace it with extra chocolate chunks, nuts, or dried fruits for a twist.
What type of chocolate is best for this recipe?
For the authentic Bens Cookies flavor, use dark chocolate with around 60% cocoa solids. You can also mix dark, milk, and white chocolate chunks for variety.
Why are my cookies too hard or crunchy?
The key to Ben Ben’s is not overbaking. They should look slightly soft in the middle when you take them out. They’ll be up as they cool, but stay chewy inside.
Can I make the dough in advance?
Absolutely! You can refrigerate the dough for up to 48 hours before baking. Chilling helps deepen the flavors and makes the cookies even chewier.
How do I get bakery-style big cookies?
For that iconic oversized Bens Cookies look, scoop out slightly larger dough balls, about the size of a golf ball, and bake them with a few extra chocolate chunks pressed on top.
Are Bens Cookies suitable for freezing?
Yes! You can freeze both unbaked cookie dough balls and baked cookies. Just follow the freezing instructions in the recipe to enjoy freshly baked cookies anytime.
Conclusion
And there you have it, your very own batch of homemade Bens Cookies, straight from your oven to your taste buds! These cookies capture everything we love about the famous bakery version: chewy centers, golden edges, and chunky bites of chocolate and ginger.
The best part about baking them at home is the freedom to experiment. Want them extra chocolatey? Add milk and white chocolate chunks. Prefer a nutty twist? Toss in some toasted hazelnuts.
Every bite is a reminder of why Bens Cookies have such a cult following. Now, you don’t need to wait for your next trip to the shop; you can recreate the magic anytime, right in your own kitchen.
So preheat that oven, grab your ingredients, and let the sweet aroma of fresh cookies fill your home. Trust me, once you try these, they’ll become your go-to cookie recipe.

Sally Mckenney is a dedicated baking enthusiast and dessert lover who creates and shares delicious cake recipes and practical baking tips on Daily Bake Lab. Her passion for sweet treats inspires home bakers to explore new flavors and enjoy the art of baking.